Home > Working with Planning Projects > Building an Application > Advanced Project Functions > Jobsets > Defining A Jobset
Defining A Jobset
Last Updated 3/9/2012 2:02 AM
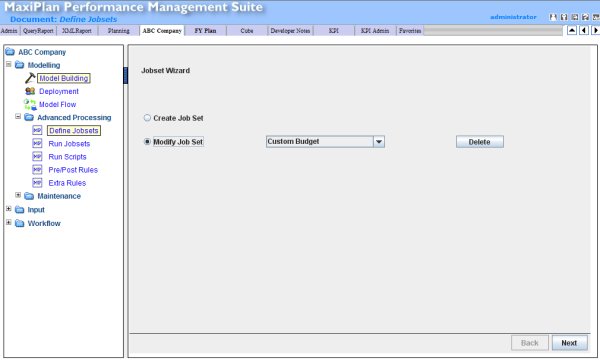
To define a jobset, click on the project folder tab and then navigate to [myproject]>-Modelling>-Advanced Processing>-Define Jobsets.
The main screen will display the Jobset wizard from which we can select one of the two options:
- Create Job Set
- Modify Job Set

Selecting 'Create Job Set ' will allow a new Job Set to be created, whilst 'Modify Job Set' allows and existing Jobset to be modified.
Job Sets can also be deleted from here, by selecting the Job Set in the drop down list and then clicking on the  button. button.
Creating a New Job Set
To create a new Job Set, first select the 'Create Job Set' option and click on the  button. The 'Add/Remove Rules' screen will be displayed, which will allow us to select the tasks we wish to include in the Job Set. button. The 'Add/Remove Rules' screen will be displayed, which will allow us to select the tasks we wish to include in the Job Set.
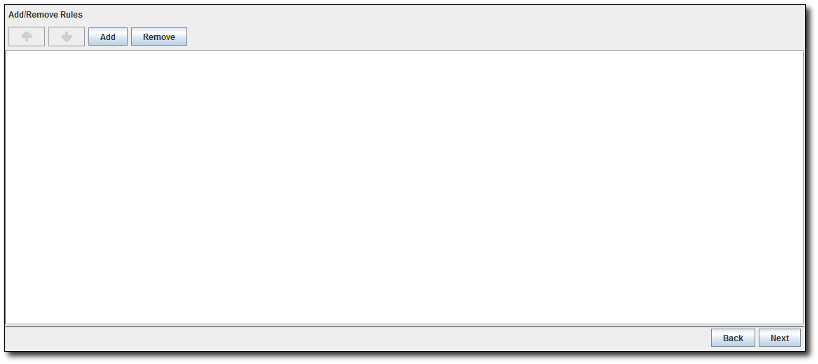
Initially the Add/Remove Rules screen is empty, as no tasks have been selected.
To add a rule, click the  button. button.
A pop-up window will be displayed displaying the models that exist in the project, followed by the Calculate category, the Zeroise category and finally if any custom MXP scripts have been defined, the Script category.
Click on any of the models displayed in the pop-up window, and it will expand to display the rules that can be executed for that model. Click on the the other items and they will show the respective rules available for execution in that category.
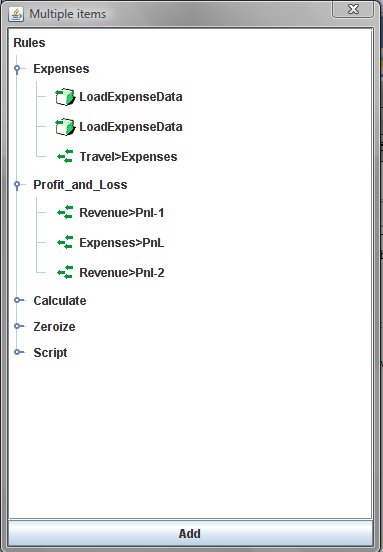
The tasks are represented by their respective icons:
 IMPORT DATA RULE IMPORT DATA RULE
 LINKAGE RULE LINKAGE RULE
 CALCULATE/ZEROIZE/SCRIPT RULE CALCULATE/ZEROIZE/SCRIPT RULE
Under each model, the model links into the selected model, are listed, along with any imports that have been defined for the model.
Under the Calculate category, for each model the options are:
- Calculate the whole model. This will calculate and consolidate the model according to the rules defined for the model.
- Calculate for a selected Version. This will calculate the model for the selected Version only.
Under the Zeroise category, for each model the options are:
- Zeroise the whole model. This will zeroise the data in the model (note that only existing combinations will be zeroised, no new combinations will be created).
- Zeroise for a selected Version. This will zeroise the data in the model for the selected Version only (as above, only existing combinations will be zeroised)
Note that:
The 'Import Data' option will only be available if you have defined the import script for the specific model.
The 'Linkage' option will only be available if you have defined links to the specific model in Model Flow.
The 'Script' option will only be available if you have defined and placed MXP scripts into the /script directory for the project.
When defining the rules to be included in a jobset, you can add the same task more than once but ensure that the order in which tasks are assigned to the jobset are correct.
To insert a rule, just select the rule you wish to add, and then click on 'Add' at the bottom of the popup screen. The popup will disappear and the rule will appear in the list of rules for this Job Set.
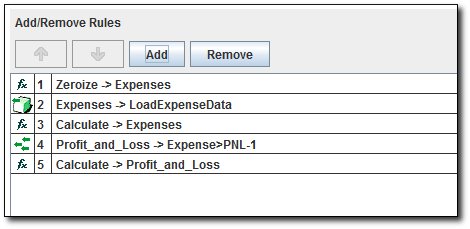
If you need to remove a rule that has been added to the jobset, simply select the rule you wish to remove and then click the  button. button.
We can change the order of the rules in our jobset by selecting a particular rule and then selecting either UP or DOWN to move the rule in the desired direction.
Once all rules have been assigned, click .
The screen will now ask us to choose a name for the newly created jobset.
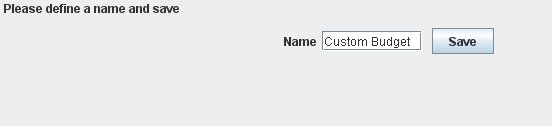
Type the desired name into the the text box and click on  and our Job Set will be created. To run the Job Set, see Run Jobset. and our Job Set will be created. To run the Job Set, see Run Jobset.
Modifying and Existing Job Set
Should we need to modify an existing jobset, we can do this at the initial screen by clicking on 'Modify Job Set' and then selecting the existing Job Set we wish to modify. Then click and the Add/Modify Rules window for the selected Job Set will be displayed.From here we can then add new rules, delete rules, or change the execution order.
See also
Run Jobsets
| 

 Page URL: