Home > Working with Planning Projects > Building an Application > Advanced Project Functions > Maintenance > List Maintenance
List Maintenance
Last Updated 3/8/2012 10:47 PM
List Maintenance provides a powerful and flexible way of maintaining several models containing the same dimension definitions. For example let's suppose we wanted to add an additional product to our list of products. This could potentially affect several models and changing the definition for multiple models can be tedious and potentially error prone. Cascade Planning identifies all models that have the same dimension structure and allows us to edit a single dimension list and apply the change to all models or if required just to one of several models.
To access List Maintenance, navigate to {Project Tab}>Modeling>Maintenance>List Maintenance
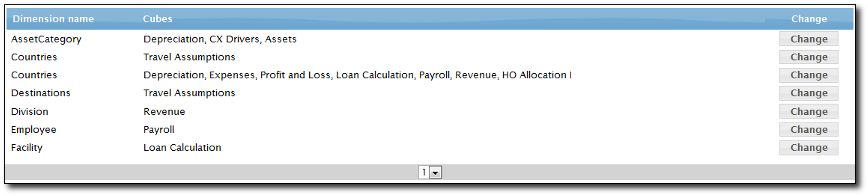
The screen displays a list of all the dimensions in your project with the models that use the same dimension. By same dimension, we mean that it must have the same members and tree structure. If a dimension with the same name has different members or a different tree structure, it will be listed as twice with the models associated with each unique dimension. This enables us to see any anomalies where we may have incorrectly used a different dimension structure for a model, since there would be two entries appearing in the list (Note: you may in fact want two different structures if for example we were using a different structure for a particular consolidation).
Editing a Dimension List
From the List Maintenance screen we can change either the list or members or the consolidation structure for any dimension shown in the list and apply the changes to all of the models using that dimension, or just selected models using that dimension.
To edit a listed dimension click on the Change button next to the dimension you wish to change.
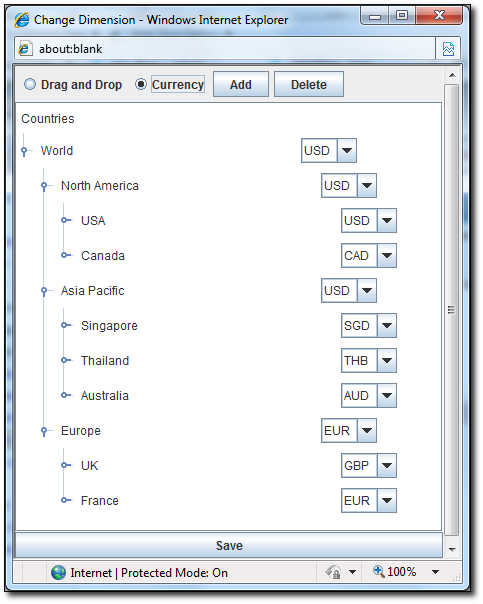
A popup will be displayed showing the current dimension members and tree structure. Clicking the mouse on a dimension member will expand or contract that branch of the consolidation tree.
Adding a New Member
To add a new member to the list, from the dimension editor popup, select the member that you wish to insert the new member under, then click the ADD button.
An input dialogue will be displayed. Enter the new member name, and click OK. The new member will appear in the tree directly below the member you selected.
Deleting and Existing Member
To delete an existing member from the list, from the dimension editor popup, select the member you wish to delete, and then click the DELETE button. The member will be removed.
To Move a Member within the Hierarchy Tree
If you need to move a member or consolidated member to a different location in the tree, select the member you wish to move from the dimension editor popup, and then click and hold the mouse down whilst you drag the member to its new location. If you drag a consolidated member to another member, be aware that this will drag all it's child members with it.
Note the Drag and Drop radio button should be selected (normally the default when you access the dimension editor) to use this capability.
To Set or Change Currency
If the dimension you are editing has been marked as a Currency dimension, then you can also change the currency for existing members or define the currency for new members.
From within the dimension editor popup, select the Currency radio button (note this will disable drag and drop, until you re-enable it by selecting the Drag and Drop radio button).
From the drop down next to each dimension member, you can modify the currency slected for that dimension. Changing the currency for any member will make that the default local currency for that member.
Saving Changes
Once you have made all the changes you wish using the dimension editor features described above, you will then need to click the SAVE button.
If only one model is using the dimension then the model will be restructured and recalculated (to redo any consolidation and apply the effect of any currency changes).
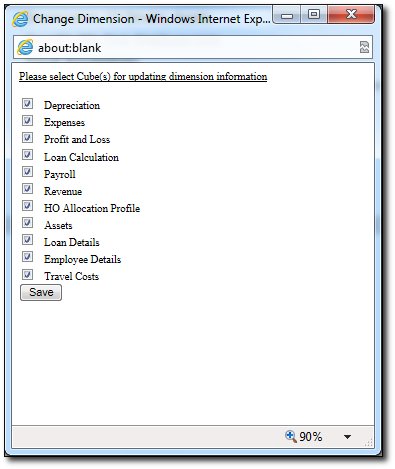
If more than one model is using the dimension, then a popup will be displayed allowing to select the models that the change should be applied to. By default all models are checked since Cascade Planning assumes that you would
want to make the changes to all models, but you can deselect any model, and when you click the SAVE button only those models selected will be restructured, recalculated, reconsolidated and saved.
See also
| 

 Page URL: