LinkIndexPrint
Contents
 Welcome
    Ask MaxiPlan
 Using Cascade Planning
    Data Entry Shortcuts
 Working with Planning Projects
    Designing A Cascade Project
    Project Management
       Creating and Maintaining Projects
       Period Sets
       Currencies
       Creating A Splash Screen
       Allowing Other Users Access
       Backup and Restore
       Virtual Period Definition
       Deployment Alias
       Publish Documents
       Project Status
    Building an Application
       Building Application Models
          Building A Cube Model
             Basic Setup
             Selecting a Period Set
             Measure Settings
                Defining the Measures List
                Setting Measure Attributes
                Measure Formatting
                Defining Calculations for Measures
                Other Functions for Measures Editor
                Cross Referencing Measures
                   Dimension Order in Planning Models
                   Cross Referencing Within The Same Model
                   Cross Referencing to Another Model Cube
                   Cross Referencing to the Parent of the node
                Measure Logic Functions
                   PREVIOUS function
                   SUM function
                   MAX function
                   MIN function
                   DEPRECIATION function
                   INT function
                   ROUND function
                   ROUNDUP function
                   ROUNDDOWN function
                   IF Function
                   SWITCH Function
             Dimension Settings
                Defining Dimension Lists
                Defining Dimension Properties
             Miscellaneous
             Finishing The Model
             Advanced Features
                Specifying Consolidation Logic
          Building A Transaction Model
             Basic Set Up
             Defining Dimension Lists 
             Defining Transaction Model Fields
             Additional Definition for a List Field
             Additional Definition for an Expression field
             Additional Definition for a Lookup Field
             Optional Validation for Text, Date, Integer & Value Field
             Defining Field Format & Access
             Miscellaneous
       Model Flow and Linking Models
          Using Links (the 'Push' Method)
          Cross Referencing (the 'Pull' Method)
       Deployment and Workflow
          Deploying Models for Input and Review
          Allowing Users to Extend Models
          Setting up and Managing Workflow
          Workflow for Users
       Advanced Project Functions
          Measure Filters
          Jobsets
             Defining A Jobset
             Run Jobsets
          Data Integration
             Create Dynamic Model
             Import to Cube
             Import to Transaction
             Export Cube Data
          Maintenance
             Model Maintenance
             Link Maintenance
             List Maintenance
             Calculate all cubes
             Versions
          Pre/Post Rules
 Reports and Scripting
    Define Scripts
    Define Reports
    Publish Documents
    Manage Scripts


Home > Working with Planning Projects > Building an Application > Building Application Models > Building A Cube Model > Dimension Settings > Defining Dimension Lists

Defining Dimension Lists
Last Updated 2/22/2012 9:20 PM


We want to collect and consolidate our expense data by country, so our Expenses model requires one dimension which is the Countries dimension.

We need to select the Dimensions tab to display the model building component which will enable us to build the dimensions.

The left hand panel shows the dimensions we have defined, and the right hand panel shows the members and the hierarchy of the currently selected dimension. Since we have not yet created any dimensions or dimension lists, both frames should be empty.

If we right click the mouse on the left panel containing the dimensions for the model, a pop-up menu will be displayed and we can then select the option.


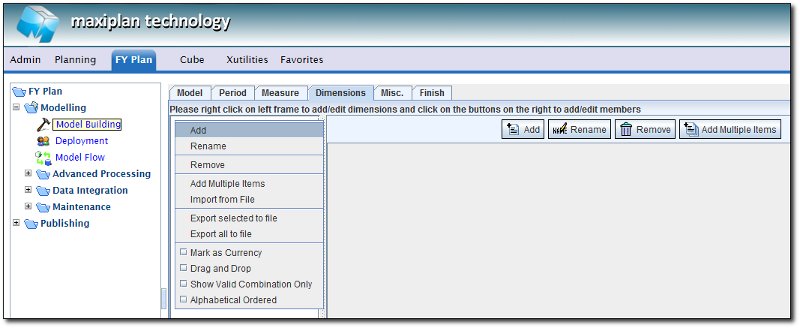
TIP: If you need to create more than one dimension at a time, select the Add Multiple Items option which will enable you to add several dimensions at the same time.

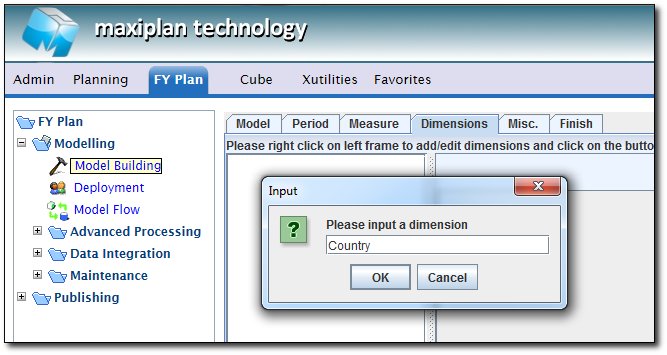
When we click on the  option, a pop-up will appear enabling us to enter the dimension name. In our case, we will enter the dimension name Country.


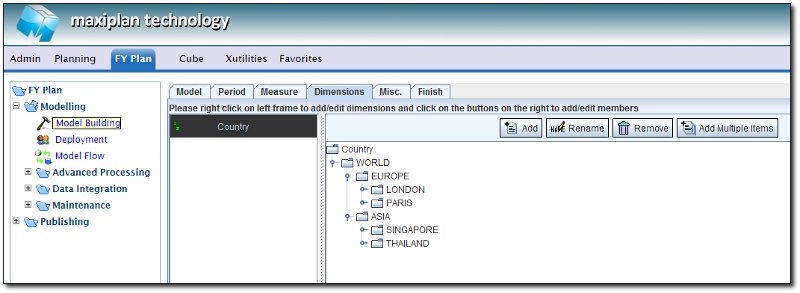
Now we need to specify the members of our Country dimension.
To do this, we select the dimension and click the  button at the top right of the member list frame.

A pop-up will appear into which we can enter the dimension member names. For our example, we will add the following members.

 LONDON
 PARIS
 EUROPE
 SINGAPORE            
 THAILAND
 ASIA
 WORLD

Once we have entered the members into the pop-up, we just click the  button to save the members into the dimension list.


Next we need to organise our member list into a hierarchy.

We can do this by first selecting a member, for example, London, and then left click on the selected item, and whilst holding the mouse button down, we drag the item and drop it onto the item we want it to belong to, in this case Europe.

To select multiple items to drag and drop, use the CTRL left mouse combination. To select a range of items, select the first item in the range and then hold the SHIFT key down whilst selecting the last item in the range.

In our example, we want to have London and Paris consolidate into Europe, and Singapore and Thailand consolidate into Asia, and then Europe and Asia consolidate into World


See also


See also